Chapter 5: Assembling the Threaded Pipe to Fittings with Pipe Tape as per drawing
Once pipes and fittings are threaded as per requirements, you need to connect pipes with the help of fittings so that a path for the flow of fluids or gases is created. There are many national and international standards for pipe threads while two commonly adopted standards are NPT and BSPT. Parts with matching threads performs better because it makes the join stronger and leakage free. However, it is not always the case, therefore pipe tape or sealants are used as common practice to make pipe joints tighter.
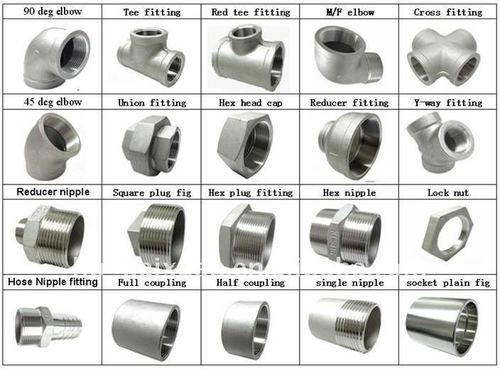
Collecting the fittings (allocate all fitting stuffs)
After correctly measuring the pipe size all the required fitting is to be collected. There are various fittings available as shown below. Collect the fitting according to your work requirement.
Collecting the threaded pipes in position
Upon collecting fittings required to join threaded pipes, it is necessary for collecting the threaded pipes which are to be joined. Then position the pipes in such way that one end which is to be joined is held free and other side is hold firmly.
Warning
Not available
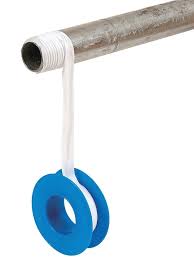
Fixing the fittings with pipe tape to pipe in position (wrap the tape around pipe and join)
1) Clean the male threads at the end of the pipe with soft cloth or rag.2) Place the end of pipe tape on the second thread from the end of the pipe and hold it with a finger or thumb.3) Tightly wrap the tape around the pipe in the direction towards the direction of threads to conform tape to shape of threads.4) With the pipe tape or sealing material in place, hand tighten the pipe and fittings as a joint.5) Then, using pipe wrench, one on the pipe and one on the fitting, tighten one and a half more turn or tighten with conscience.6) Use pipe clips at regular intervals to support the pipe so that it does not sag because Steel or galvanized pipes are heavy, and it must be well supported.
Checking the tightness/testing pipe joints
Warning
verify if joined pipe is working wee (not available)
It is extremely important to test all joints for leakage and other malfunctions. So that undesired mishaps like leak and burst would not occur later. Given below are the guides which are to be strictly followed checking tightness:
1) Create a solution mixing a bit of water with dish detergent.2) Then, take a soft brush and coat the solution all over the joints.3) Run the flow of fluid or gas in the pipe through joined section.4) Any bubbles produced indicates a leak. Then, shut off the gas or fluid, retighten the joint and retest.5) If any bubbles do not appear. Then, all is well.
There are various pipe joints tests which are listed below:
1. Hydrotest for pipe fittings
- Hydrotests are not required for pipe fittings unless specifically requested by client. Depending on the system specification the finished installation must satisfy one or both of following tests
Hydrostatic test
Pneumatic test
2. Proof test
To ensure the design of pipe fitting, meet all the accepted standard and code requirements burst test is performed. In this test a pipe and fittings are joined to prepare a dummy pipe spool. This dummy pipe spool is then pressurized to pre-define calculated burst test pressure. If the joint along with fittings withstand the test, then the pipe joint is considered safe for use.
3. Non-destructive test
- Any of the following non-destructive testing are performed on finished fitting to ensure the soundness of the product.
Ultrasonic
Magnetic particle test
Liquid penetrant test
Positive material identification
4. Destructive test
- Destructive test are performed to check the strength of the body and join of the pipe.
Burst test
Tensile test
Impact test
Hardness test
5. Special test
- Special tests are carried out on fittings to confirm its ability to confirm its ability to withstand in corrosive environments. These tests are
Ferrite
Intergranular corrosion test
Hydrogen induced cracking
Sulfide stress corrosion cracking and so on
6. Visual Inspection
It is conducted on fittings to check any surface imperfections. Joints is checked for any visible surface imperfections such as die marks, porosity, undercuts and dents. Acceptance of joint is as per applicable standard.
Marking, laying, using chalk line to wall/floor/ceiling
Pipe laying usually outside work, laying pipe underground, installing piping systems in buildings, aeroplanes or ships. When it comes to the question of marking and laying, chalk line is the common answer. Chalk line is nothing, but a line drawn with chalk.
1) Fill the chalk box about half full of powdered chalk. Tap the chalk box occasionally to settle the chalk.2) Mark the points in floor/wall/ceiling through which chalk line must be passed through3) Hook one end of string and stretch the string tight so it crosses directly over the marks drawn by you.4) Reach out the farthest straight distance as required and grab the string between your forefinger and thumb.5) To draw the straight chalk line, lift the string straight up about 4 inch and release it. The snap of chalked thread leaves the line printed on floor which we call the chalk line.6) To draw long lines accurately, use a helper or a hook on both ends to hold the thread. Then, press down on the string about midway between the ends with your thumb. Lift and snap the string on one side and similarly on other side. It helps us to prevent from unnecessary double lines.7) Once marking with chalk line finishes, start with the pipe laying process by laying the pipe wherever the mark has been made by chalk line.
Accurate pipe cutting with margin of necessary threads to pipe
We need to have accurate size of pipe while laying the pipe in the system.
For example, suppose you are laying the pipe in floor. And you need another pipe of 45 cm to take it to the required destination. Let fitter (female threading) that connects the pipe is of 15 cm with 5 cm threading on both ends. So, you need to cover 35 cm more distance. You need to cut 40 cm (35cm + 5cm) pipe allocating 5 cm for making necessary threads.
Warning
(Pic need to be created)
Fixing pipe to pipe vice
A pipe vice has serrated jaws to grip the pipe and prevent it from turning. While selecting a plumber’s vice, it is important to consider how securely the pipe is in the vice. Yoke vice, combination vice and chain vice are different vice used in plumbing. The given figure is a York vice which is common choice among plumbers.
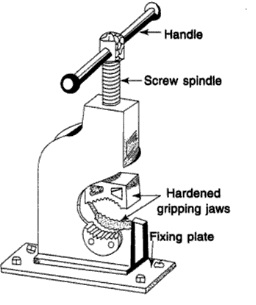
Figure 5-1. Pipe vice
Warning
Not complete